This Blog has Moved

This blog has moved to www.allyplm.com/blog

To stay up-to-date with the latest news, tips and tricks, product enhancements and maintenance packs for Siemens PLM Software solutions, visit our new site!

For resources for specific products, you can navigate directly to the product resource page:
... and more!
Showing posts with label Siemens NX. Show all posts

Friday, December 4, 2015

NX Tip of the Week December 4


NX Tip of the Week
December 4, 2015

NX - Exporting to a Spreadsheet from Navigator 

Hello everyone,

In this week's Ally PLM Tip of the Week, we will take a look at a how to export content from the Assembly Navigator.  In any navigator window, we can configure the content that shows up in the columns.  Once these columns are configured, we can easily export this information to a spreadsheet for capture.

Here is a short video that demonstrates this tip:


Thank you,
Brandon Carter
Senior Application Engineer
Ally PLM Solutions, Inc.


Want more tips? Sign up HERE to receive our Tip of the Week. 
Register for upcoming free NX webinars or learn more about Ally PLM Solutions.

Friday, November 20, 2015

NX Tip of the Week November 20


NX Tip of the Week
November 20, 2015

NX - Editing the Post Processor in NX CAM

In NX CAM, you can edit the standard post processor list enabling you to add your own post processors to the list. You can also reorder the list according to the posts you use most frequently. This can be very useful because this keeps you from having to browse to a certain post that wasn't in the list when your software was installed.  

Here is a short video that shows the standard post list, adding a post to the list, deleting posts from the list, and re-ordering the post list:


Thank you,

Chad Varney
Application Engineer
Ally PLM Solutions, Inc


Want more tips? Sign up HERE to receive our Tip of the Week.


Register for upcoming free NX webinars or learn more about Ally PLM Solutions.

Friday, October 16, 2015

NX Tip of the Week October 16

NX Tip of the Week
October 16, 2015

NX - Using the In Process Workpiece for
Multiple Setups in NX CAM

You can use the In Process Workpiece (IPW) for multiple setups in NX CAM making programming easier and more efficient.  Using the IPW as Blank Geometry can help you visualize the material that has already been cut and also allow NX to create very efficient operations without excessive tool path motion.  The steps below will show the process for using the IPW in a part that requires multiple setups.

1)  The part starts out with the blank defined using a bounding block:

2)  After the operations on the first setup have completed the IPW looks like this:

3)  Now I will use the IPW option to define the blank for the second setup:

4)  Select Source for IPW:

5)  Use the WORKPIECE from the first setup:

6)  Use the Update button to load the IPW from the first setup:

7)  Notice the IPW displays with the operations from the first setup complete:

8)  This shows the second setup operations have been completed and now the IPW is ready for the third setup:


Thank you,
Chad Varney
Application Engineer
Ally PLM Solutions, Inc.

Want more tips? Sign up HERE to receive our Tip of the Week.

Register for upcoming free NX webinars or learn more about Ally PLM Solutions.

Friday, October 9, 2015

NX Tip of the Week October 9


NX Tip of the Week
October 9, 2015

NX - Surfacing Tools

Hello everyone - In this week's Ally PLM Tip of the Week, we will take a look at a few different surfacing tools within NX.  I'm defining surfacing tools as any tool required to get more than just a simple shape; more than just extrude or revolve.  The underlying curves are what give the surface definition.  The surface is only as good as the underlying curves.  You may have asked yourself, which surfacing command should I use to create my desired shape?  For example, if we are trying to loft a shape from section to section, you may be trying to determine the difference between Through Curves and Through Curves Mesh.  We will look at the requirements for some of these commands as well as some of the options.  All of these commands have the option to create a solid or sheet (surface) in the settings. 

When defining a surface we look at something called U and V lines.  U and V lines are the definitions for a surface.  Imagine you take a surface and mesh it.  The lines in one direction will be U direction and the lines perpendicular to the U lines will be V lines.

Typically, when we are defining the curves to create our surface, sections will be in one direction (U direction) and the cross curves will be in the other direction (V direction), for example.

Let's take a look at some of these commands:
1) Ruled Surface
Ruled surface requires two sections and only two sections.  The result uses a lofting technique from one section to the other.

2) Through Curves 

Through Curves requires a minimum of two sections, but can have more than two.  This is a lofting technique that can do more than two sections.

3) Through Curves Mesh 

Through Curves Mesh requires a minimum of two sections, but can have more than two.  It also requires a minimum of two cross curves, but can have more than two.  Cross curves are typically defined in the perpendicular direction to the section inputs.  This technique lofts from section to section and applies the cross curve definitions in the other direction.  The cross curves must be connected to the sections.

4) Studio Surface 

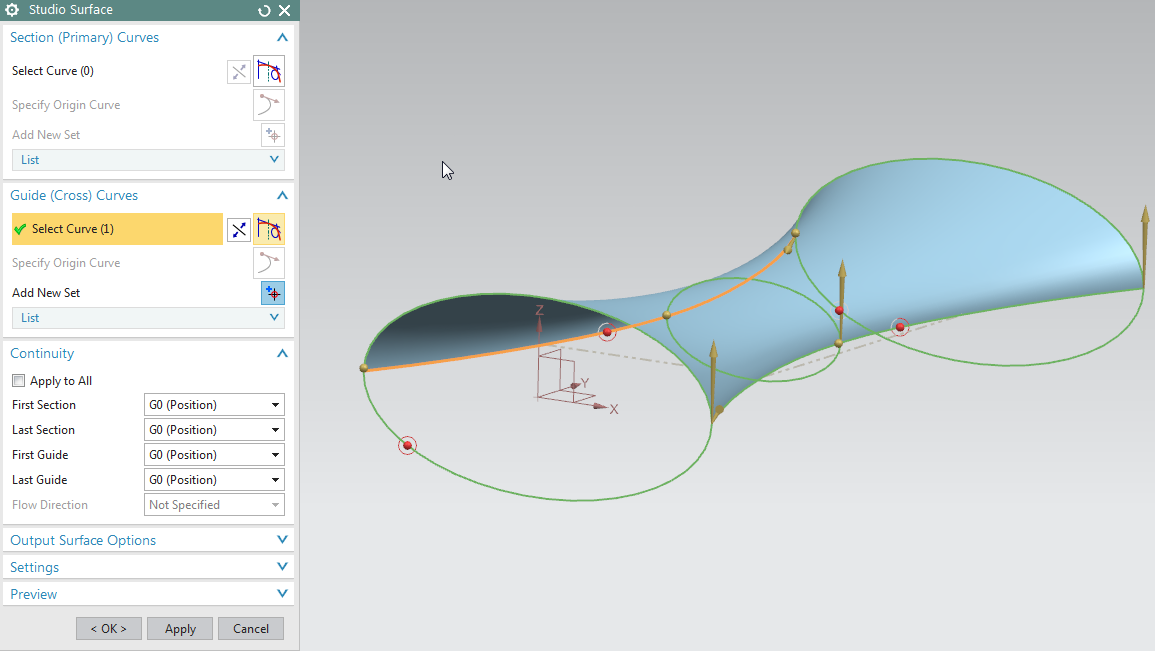
Studio Surface is similar to Through Curves Mesh as far as definition.  It produces swept for lofted features from a network of section strings, or a network of section strings and up to three guide strings.  It requires at least two inputs.  It can be two sections or one section and one guide/cross curve at minimum.  Studio Surface also has some other options for flexibility within the feature.  Studio Surface can create lofted shapes or swept shapes within the same command. Studio Surface also previews as soon at two inputs are defined.  The cross curves do not have to be connected to the cross sections to get a result.  

Studio Surface has an option called "Switch Strings" which can toggle your U and V line definition curves: 

5) Sweep Along Guide 

Sweep Along Guide requires one section and one guide curve.  It takes the section and sweeps it down the guide definition.

6) Tube 

Tube just needs a path definition.  The cross section is determined to be circular with tube parameters included.

7) Swept

Swept takes a cross section definition and sweeps it along a path.  It can have multiple sections but only up to three guide strings.  In the screen shot below, the section and guide curve is not connected.  They do not need to be connected for the swept algorithm.

8) Variational Sweep 

Variational Sweep takes a profile and sweeps it between two curves or surface edges.  Because it is a sweep, the sketch section is created with the on path option.  How the sketch is connected to the surface edges/curves determines its sweep path.  It varies as it transitions between the input curves.  You can sweep faces that are coincident, tangent, or normal to other curves and faces, add secondary sections to vary dimensions at specific locations, or extend the body beyond the length of the path or limit it.

In this Ally PLM Tip of the Week, we took a look at some of the requirements for the different surfacing tools.  This information can help you pick the proper feature for your desired surface requirement.

Brandon Carter
Senior Application Engineer
Ally PLM Solutions, Inc.

Want more tips? Sign up HERE to receive our Tip of the Week. 

Register for upcoming free NX webinars or learn more about Ally PLM Solutions.


Friday, August 28, 2015

NX Tip of the Week August 28


NX Tip of the Week
August 28, 2015

NX - Snap to Object
When modeling in NX there are many times where we want to extend a shape to another shape.  For example when using "Pull Face" in Synchronous Modeling, we want to pull a face to be parallel with another existing face on the model.  Of course, we can measure the distance between the 2 faces and input that value into the dialog.  However, there is a shortcut that can save you time and avoid the possibility of accidentally inputting an incorrect value.  The steps below will show how to use "Snap to Object" in the Extrude command when creating blank stock to be used in NX CAM.  Keep in mind that "Snap to Object" is available in multiple commands in NX.
1)  This is the part that I will be programming using NX CAM. In modeling, I will create a blank shape representing the raw material:
2)  Within the Extrude command, I have started the extrude 1.5" from the back of the part:


3)  Since I want the extrude to extend to the front face of the part I will use "Snap to Object" by right clicking on the blue arrow:


4)  Then I will simply pick the face I want to extend to:


5)  As you can see, the extrude is now extended to 5.6" which is parallel to the face of the part:

Thank you,
Chad Varney
Applications Engineer
Ally PLM Solutions, Inc.

Want more tips? Sign up HERE to receive our Tip of the Week. 


Register for upcoming free NX webinars or learn more about Ally PLM Solutions.


Friday, July 31, 2015

Tip of the Week July 31

NX Tip of the Week
July 31, 2015

NX - Creating Dimension Line Breaks with NX 10
Hello everyone - In this week's Ally PLM Tip of the Week, we will take a look at creating Dimension Line Breaks in Drafting with NX 10.
1)  Edit the Settings of the desired dimension(s)
     a.  Right click on the dimension and go to Settings:
2)  Expand "Line/Arrow" and select "Break"
     a.  Turn on "Create Breaks".  Notice you can adjust the size of the break here as well:


3)  Click Close on the Settings Dialog.

4)  Now drag the dimension around and intersect the others.  NX will automatically create the dimension line break.  Notice it is fully associative and understands where it needs the break:


5)  For more information on what's new in NX 10 Drafting, take a look at our "What's New in NX10 CAD: Part 2" Lunch Byte on our website

In this Ally PLM Tip of the Week, we looked at creating Dimension Line Breaks with NX 10 Drafting.  

Click HERE to watch a video of this tip:


Brandon Carter
Senior Application Engineer
Ally PLM Solutions, Inc.

Want more tips? Sign up HERE to receive our Tip of the Week.


Register for upcoming free NX webinars or learn more about Ally PLM Solutions.

Friday, July 24, 2015

Tip of the Week July 24

NX Tip of the Week
July 24, 2015

NX - Keyboard Shortcuts in NX
There are many keyboard shortcuts in NX that can help speed up your design and manufacturing processes.  Keyboard shortcuts save mouse travel and reduce the number of mouse clicks needed for a variety of functions in NX.  There are many predefined keyboard shortcuts within the system.  You can also customize the system to create your own keyboard shortcuts.  The steps below will show you where to locate the keyboard shortcuts that are already defined in the system and how to create your own keyboard shortcuts:

1)  Many common NX functions have keyboard shortcuts already assigned.  The keyboard shortcut can be seen in the "Tool Tip".  This example shows that "Ctrl+Alt+T" is the shortcut to orient to the Top view:


2)  To display a complete list of existing keyboard shortcuts go to Menu > Information > Custom Menu Bar > Shortcut Keys:


3)  You can also create your own shortcut keys by going to File > Customize:


4)  In the Customize dialog, select "Keyboard...":


5)  In the Customize Keyboard dialog, locate the Command you would like to assign a shortcut key.  Specify the shortcut key and then click "Assign".  In the example shown below the letter "G" is being assigned to the Generate command in the Manufacturing Environment:


Chad Varney
Application Engineer
Ally PLM Solutions, Inc.
Want more tips? Sign up HERE to receive our Tip of the Week.


Register for upcoming free NX webinars or learn more about Ally PLM Solutions.


Friday, July 10, 2015

Tip of the Week July 10

 NX Tip of the Week
July 10, 2015

NX - Fixing issues with opening NX files from Windows Explorer

If you have had multiple versions of NX on your PC in Windows Explorer, there are times you can't double click on the file and have it open. At times, NX may open but the file does not open or it errors out. You may have multiple versions of NX loaded and you need to have Windows Explorer open the file in a specific version of NX when you double click.  Here is how to change/fix this:
1)  Open a command prompt (Windows Start Menu then type cmd in the search window - a black window should appear).

2)  Type in the following:  assoc .prt

3)  You should see .prt=UGpartfile

4)  Next, type in the following:  ftype UGpartfile

5)  If all is correct, the NX 10.0 is the version which you want to open when you double click from Windows Explorer, then you will see:  
UGpartfile="C:\Program Files\Siemens\NX 10.0\UGII\ugs_router.exe"  -ug -use_file_dir  "%1"

6)  Or, if you had NX 7.5 previously installed and you uninstalled it, you may see:  UGpartfile="C:\Program Files\UGS\NX 7.5\UGII\ugs_router.exe"  -ug -use_file_dir  "%1". Then again, you may see something different or nothing at all.

7)  This would mean the ugs_router.exe from NX 7.5 is being used and not the proper NX version you would prefer. In your case, you want it to use NX 10 so you would do the following: 
In the command prompt for NX 10, type:  
ftype UGpartfile="C:\Program Files\Siemens\NX 10.0\UGII\ugs_router.exe"  -ug -use_file_dir "%1"
Note, NX 8 is the first version to use the Siemens directory and not UGS for the installation. If you have a 32 bit version of the product installed on a 64 bit machine, you will need to use C:\Program Files (x86)\Siemens\NX 8.0\UGII\ugs_router.exe. 

In addition, when starting NX by double-clicking on an NX part file in Windows Explorer and you want to stop the 'Routing to Application' dialog from appearing, try adding "-disable-cancel" to the ugs_router.exe: 
"C:\Program Files\Siemens\NX 10.0\UGII\ugs_router.exe"  -ug -use_file_dir -disable_cancel "%1"

As always, contact support@allyplm.com for more information or help.
Madison Rye
Application Engineering Manager
Ally PLM Solutions, Inc.

Want more tips? Sign up HERE to receive our Tip of the Week.

Register for upcoming free NX webinars or learn more about Ally PLM Solutions.