This Blog has Moved

This blog has moved to www.allyplm.com/blog

To stay up-to-date with the latest news, tips and tricks, product enhancements and maintenance packs for Siemens PLM Software solutions, visit our new site!

For resources for specific products, you can navigate directly to the product resource page:
... and more!

Friday, August 29, 2014

Tip of the Week August 29

Solid Edge - How to Extract the Executables Downloaded from the
Siemens Site with ST7


Hi Edgers,
Did you know that you can extract the executables downloaded from the Siemens site for ST7?  If you download the ST7 software, you can use a free product like 7-Zip (http://www.7-zip.org) to extract it and you can see all the files as they would appear on the DVD. This way you don’t have to run that executable and wait for it to unpack each time:
  1. Download and install 7-Zip (http://www.7-zip.org
  2. Open 7-Zip
  3. Navigate to the location of the download for ST7
  4. Click the extract button, choose a location then click OK:


      5.  See the folders the same way as the DVD: 

Madison Rye
Application Engineering Manager
Ally PLM Solutions, Inc 

Want more tips? Sign up HERE to receive our Tip of the Week.
Register for upcoming free Solid Edge webinars and learn more about Ally PLM Solutions


Wednesday, August 27, 2014

Nucleic acids provider speeds DNA synthesis machine design with more data re-use

Integrated DNA Technologies designs better with Solid Edge. Serving academic, government and commercial researchers in biotechnology, clinical diagnostics and pharmaceutical development, the company also uses Solid Edge and Teamcenter to enhance communication and access to product data company-wide and build new business opportunities.


Try Solid Edge for free

Friday, August 22, 2014

Tip of the Week August 22

NX - Hidden Uses of the Middle Mouse Button   


Everyone is always looking for shortcuts to get their work done quicker. One of the often overlooked tools for doing this in NX is the Middle Mouse Button. There are several uses for this mouse button that you probably only use to rotate your view. There are four main uses for the middle mouse button that we will show in this video:
  1. OK/Apply - You can use the middle mouse button to select the currently highlighted button. For example, use it instead of clicking OK when choosing a new file or ending a command. 
  2. Start a new line when drawing a profile – Click the middle mouse button to disconnect from the current set of segments and start a new one. Click it twice to exit the sketch tool.
  3. Close Sketch Tools - Click the middle mouse button to exit out of sketch tools such as Circle.
  4. Advance Dialogs - Use the middle mouse button to advance to the next step in a dialog. For example, when applying constraints to sketches.   

Click HERE to watch the video:  


Ben Roll
Application Engineer
Ally PLM Solutions, Inc

Want more tips? Sign up HERE for our Tip of the Week and Newsletter 

Register for Ally PLM's upcoming free NX webinars or learn more about our world-class training.

Learn about Ally PLM Solutions at www.allyplm.com

Wednesday, August 20, 2014

Vehicle seat maker cuts complex assembly design time 30%, prototyping time 70%

Seats Inc. designs better with Solid Edge. The move from 2D to 3D design delivers major results, including:
higher design productivity; complex assembly creation time reduced 30 percent; prototyping time slashed 70 percent with lower cost; and error-free data for customers. Also, advanced sheet metal, foam molding, and routing is now installed in house for lower production time and costs.

Friday, August 15, 2014

Tip of the Week August 15

Solid Edge - How to Embed Non-Solid Edge Documents in a Solid Edge File

Learn how to use the Binder tool to embed non-Solid Edge documents in a Solid Edge file (Part/Assembly/Sheetmetal/Draft).

We get revision requests all the time and it’s difficult to keep track of the work we did in a particular part/assembly revision number. One tool that’s really helpful in this scenario is the Binder tool: 

1.  Select the Application button > Manage > Binder :  


2.  Click Add and you can create new files: 

3. You will see a list of file types you can create:

4. In this example, we are creating a word file:

5. Hit OK.

6. The new file automatically takes the name of the existing assembly and is embedded in the SE document:

7. Save the assembly file.

8. In the future if you want to edit the document, all you have to do is go back to the Binder command and then click on Edit:

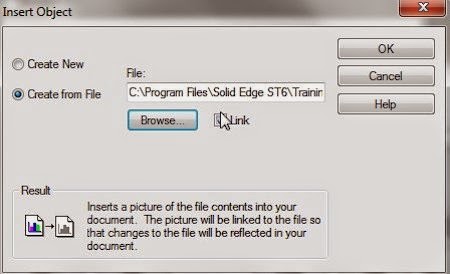
If you have an existing non-Solid Edge document which you would like to embed, use Create from File option:

Navjot Gill
Application Engineer
Ally PLM Solutions, Inc  

Want more tips? Sign up HERE for our Tip of the Week and Newsletter

Register for Ally PLM's upcoming free Solid Edge webinars or learn more about our world-class training.

Learn about Ally PLM Solutions at www.allyplm.com


Wednesday, August 13, 2014

Design and manufacturing services company makes CAD changes 10 times faster than traditional history-based CAD

Trlby Innovative designs better with Solid Edge. The use of synchronous technology helps a small company impress its large company customers. Other results from synchronous technology use include easily beating customer deadlines, exceeding customer expectations and creating designs not feasible in history-based CAD.  Trlby provides diversified product design, development and manufacturing services for a client base that is almost exclusively made up of Fortune 500 companies across multiple industries.


Learn how
http://www.plm.automation.siemens.com/en_us/about_us/success/case_study.cfm?Component=198476&ComponentTemplate=1481
Try Solid Edge for free

Monday, August 11, 2014

Solid Edge ST7 NOW Available for Download

Download ST7 now!
Solid Edge ST7 English is NOW available for download from https://download.industrysoftware.automation.siemens.com/download.php

Additional languages will be posted for download as they become available. 


Click HERE to get more sneak peeks about ST7 and more.

Friday, August 8, 2014

Solid Edge ST7 Available for Download

Ally PLM is excited to announce the release of Solid Edge ST7!

ST7 has been released to manufacturing and will be available for download next week. Solid Edge ST7 English will be available for download from https://download.industrysoftware.automation.siemens.com/download.php by early next week or shortly after customer license files are available. Additional languages will be posted for download as they become available. 

First customer ship of the English product DVDs should begin in a couple of weeks. Additional languages will following shortly. 


To learn more about what's new with Solid Edge ST7, click on our replay of Lunch Bytes - What's New in Solid Edge ST7 - Part 1 or register for What's New in Solid Edge ST7 - Part 2

Click HERE to get more sneak peeks about ST7 and more. 


    Crane manufacturer gains tight control over millions of product configurations

    Street Crane designs better with Solid Edge. With Solid Edge, Street Crane addresses the challenges of complex data management, control and access by Internal and external users.  The results include significantly improved customer response/support, greater product innovation and tight control over millions of possible product configurations.


    Learn how

    Try Solid Edge for free


    Tip of the Week August 8

    Solid Edge - Placing a Subassembly Using a Configuration


    When placing subassemblies, users have the ability to select display configurations and open as settings to determine how they want that assembly to be displayed.

    1.  To access this simply right click in the white space of Parts Library to invoke the shortcut menu. Next, select Assembly – Use Configurations and Open As Settings. Be sure to toggle this options back off to disable this function:  


    2.  After turning the option on, when you drag in a subassembly, a dialog will be presented with the option to select a configuration. You as also presented with the option to choose how you want the assembly to open as. If it’s a larger assembly, you can choose to inactive all the parts or use a simplified version of the assembly or parts files. This will help save on memory and speed up performance of your machine: 


    Ben Weisenberger
    Application Engineer
    Ally PLM Solutions, Inc  

    Want more tips? Sign up HERE for our Tip of the Week and Newsletter


      Register for Ally PLM's upcoming free Solid Edge webinars or learn more about our world-class training.


    Learn about Ally PLM Solutions at www.allyplm.com


    Friday, August 1, 2014

    Tip of the Week August 1

    NX - Chain Between Option with NX  


    In this week's Ally PLM Tip, we are going to look at the option to Chain Between inside of the NX Selection Filters. This option can help us minimize mouse clicks when selecting multiple edges and other geometry types.

    1 - In this example, we are going to create another body by extruding the perimeter of the existing body: 

    2 - Notice the different selection filters that help you pick up multiple items based on design intent: 


    3 - For example, if we choose Single Curve, we only get one edge selected: 

    4 - If we choose Tangent Curves, we get what we want because of the tangencies created by the Edge blends at the intersections: 


    5 - What if we didn’t have the tangencies all the way around the perimeter?  Then we would have to do multiple selections:


    6 - I could use Face Edges, but I would have to deselect all the inside pockets:


    7 - If I use Connected Curves and try to pick up model edges, it will not pick up the entire perimeter.  I need to turn on Chain Between:
    a.    To turn on Chain between, click on the More button (Blue Arrow):


    b.    Turn on Chain Between and click Close:


    c.    You have to tell NX how to chain around the connected edges of the part:
           i.    I’m going to click on the left side of the top horizontal edge to tell NX to chain to the left                          starting with that edge:


           ii.    Then I’m going to click on the bottom of the right vertical edge to tell NX to chain to that side of the right edge:


             iii.    This is telling NX to chain to the left around the part back to the right edge at the bottom.

        d.    This allows us to get our selection with 2 clicks, especially if there are not any blends or tangencies on the model:


    In summary, we can turn on Chain Between under the More button on the selection toolbar to help minimize the number of mouse clicks we have when picking up a series of edges, etc.  Make sure you click the proper side of the edges to infer the chain between direction.

    Click HERE to watch this video demonstration:


    Brandon Carter
    Senior Application Engineer
    Ally PLM Solutions, Inc

    Want more tips? Sign up HERE for our Tip of the Week and Newsletter 

    Register for Ally PLM's upcoming free NX webinars or learn more about our world-class training. 

    Learn about Ally PLM Solutions at www.allyplm.com