This Blog has Moved

This blog has moved to www.allyplm.com/blog

To stay up-to-date with the latest news, tips and tricks, product enhancements and maintenance packs for Siemens PLM Software solutions, visit our new site!

For resources for specific products, you can navigate directly to the product resource page:
... and more!

Friday, December 19, 2014

Maintenance Pack 03 for NX 9.0.3 is Now Available

We are pleased to inform you that Maintenance Pack 03 (MP03) for NX 9.0.3 is now available for download from the Siemens PLM download server. NX 9.0.3 MP03 is an accumulationof fixes built for installation on top of        Windows 64-Bit and Linux 64-Bit images of NX 9.0.3.
   
Select one of the following links to download this maintenance pack or to review the README.  Note: A valid WebKey account is required. 
   
Linux 64-bit:
https://download.industrysoftware.automation.siemens.com/unigraphics/maintenance-packs/nx9/linux64/
   
Windows 64-bit:
https://download.industrysoftware.automation.siemens.com/unigraphics/maintenance-packs/nx9/win64/
   
Please refer to the README file for Maintenance Release installation instructions.

The Ally PLM Technical Support Team is available to answer any questions and provide support for all of your    needs including Maintenance packs.  You can contact the Ally PLM Technical Support Team via email at             technical.support@allyplm.com or via phone at (513) 984-0480 Option: 4.

Tip of the Week December 19

 NX Tip of the Week
December 19, 2014

NX - Using Margins in Drafting with NX 9

Hello NX Users - In this week's Ally PLM Tip of the Week, we will take a look at using margins in NX 9 to create dimensions in drafting as well as aligning dimensions so they track together as you move them.

1)  Margin Options/Values

     a. Go to Preferences-Drafting to get to the Drafting Preferences:

       b. Type "margin" in the search: 


      c. Select the line that says Margin - First Offset

    d. Notice the options for First Offset and Spacing:

2) Placing Dimensions to Margins

a. Go to a Linear Dimension

b. Make sure "Place Automatically" is unchecked:

c. Click the points for the dimension

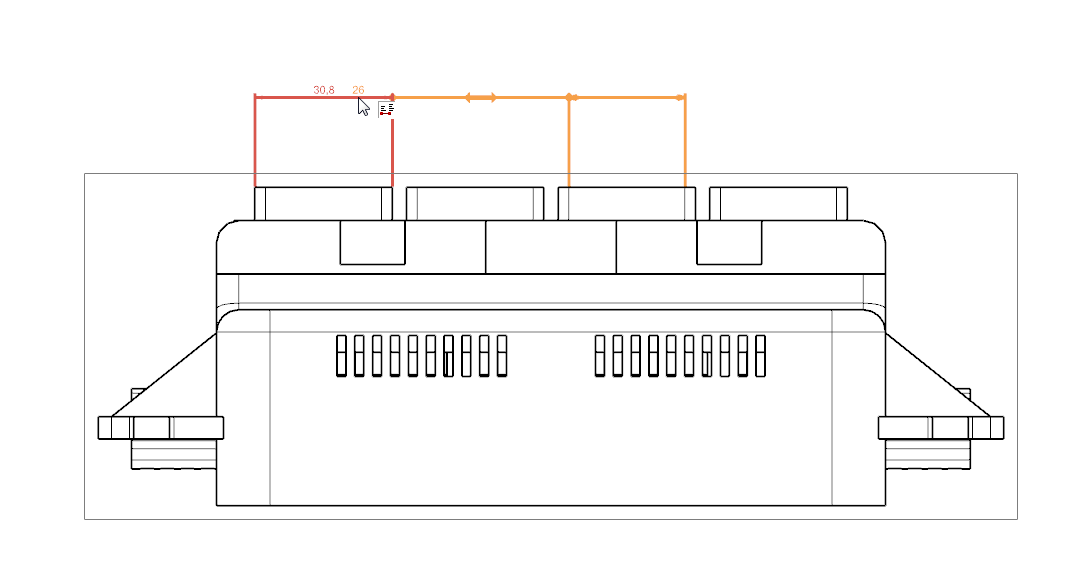
d. Notice as you move your cursor up, the dimension wants to snap to the margins.  The first margin is the first offset (40 mm), every step after that is the spacing offset (10 mm):

e. Create another Linear Dimension

f.  This time make sure "Place Automatically" is on:


g. As soon as the dimension object is selected, the dimension is automatically placed at the first margin (first offset):

3) Create a dimension alignment

          a. Drag the placement dimension to hover over the target dimension.  The target dimension would be the dimension that drives the movement and the placement dimension will track along with it:
          b. This can also be done on creation. While placing the dimension, you can hover over the target dimension to create an alignment:

c. Notice if I move the first dimension, the others track along as well. 

In this Ally PLM Tip of the Week, we looked at using margins to help align and keep dimensions nice and clean in Drafting.  We also looked at how to make dimensions associative, so if one moves the others track along with it.  I hope everyone has a great Holiday Season and a Happy New Year!

Click HERE to watch the video of this demonstration: 

Brandon Carter
Senior Application Engineer
Ally PLM Solutions, Inc.

Want more tips? Sign up HERE to receive our Tip of the Week.
Register for upcoming free NX webinars or learn more about Ally PLM Solutions.

Wednesday, December 17, 2014

Solid Edge ST7 - Maintenance Pack 3 Announcement

Solid Edge ST7 Maintenance Pack 3 for Solid Edge is now available for download.

Maintenance Packs are released for CRITICAL items only. Maintenance Packs are available up to a maximum of 15 months following the release date of the English version. The release date for Solid Edge ST7 English was 08/08/14, making the Maintenance Pack cutoff date 11/08/15.

ST7 Maintenance Packs can be downloaded from:
https://download.industrysoftware.automation.sieme​ns.com/solid_edge/ST7/Maintenance_Packs/

A valid WebKey account is needed to access Maintenance Pack downloads. To create a WebKey you need your Customer Sold-To ID and your WebKey Access Code, both found under Solid Edge Help, About. You can create your WebKey account here: https://plmapps.industrysoftware.automation.siemens.com/webkey/

Ally PLM encourages all of our customers to stay current with released Maintenance Packs. Maintenance Packs deliver the most current updates and resolution of PRs to your software platform. You can find detailed information regarding the PRs that a Maintenance Pack addresses in the "readme” .txt file found with the MP download.

The Ally PLM Technical Support Team is available to answer any questions and provide support for all of your needs; including Maintenance packs.  You can contact the Ally PLM Technical Support Team via email at technical.support@allyplm.com or via phone at (513) 984-0480 Option: 4

Tracy Tijan
Marketing Director
Ally PLM Solutions

Machine tool manufacturer FRÖMAG designs better with Solid Edge


Moving away from its existing 3D CAD system, FRÖMAG quickly embraced the design freedom of synchronous technology in Solid Edge. Results included faster design turnaround, easier and faster implementation of complex designs, and reduced development costs.


Try Solid Edge for free

Learn how Solid Edge can save you time on design and development at http://allyplm.com/solidedge/  or sign up for an informative webinar at http://allyplm.com/futureofcad/   

Tuesday, December 16, 2014

CAMWorks for Solid Edge 2015 Released!


To help you Program Smarter and Machine Faster, there are new features, new modules and better programming.

New Features - Enjoy new features like assigning tools to operations, light rebuilds for turn parts and more.

Better Programming - The user-experience has been given a boost with some additions including tool crib priority options, Tech-DB enhancements and define stock material based default cutting parameters.

New Add-On Module - Reduce your setup time with CAMWorks for Solid Edge Virtual Machine. Virtual Machine provides true G-code verification, the first end-to-end integration from CAD to CAM to verification and on to the machine controller.

CAMWorks for Solid Edge is compatible with Solid Edge ST7 and only available in 64-bit.

Click HERE for an overview of the key enhancements:


New feature and enhancement details are available in the Downloads Area (login required) of the website:

Special Note: Because this release has taken longer to deliver than expected and as a token of appreciation for being a valued customer, your current annual subscription program is being extended by six months!

Click HERE to learn more about CAMWorks for Solid Edge and how to apply it to your everyday work operations.

Request a quote for CAMWorks for Solid Edge.

Tracy Tijan
Marketing Director
Ally PLM Solutions

Friday, December 12, 2014

Tip of the Week December 12


NX Tip of the Week
December 12, 2014

NX - Using Visualization Tools to Analyze Your IPW in NX CAM

There are visualization tools in NX CAM that can really help you visualize the In Process Workpiece (IPW) while you are creating machining operations. It is very important to know exactly how much material is left on your part when selecting the next tool and operation in the machining sequence. Using "Show Thickness by Color" and "Clip Section" can greatly enhance your capability to analyze the IPW. Here are some steps to use these functions along with some examples of where they may be beneficial.

1)  Use Verify and 3D Dynamic to display the IPW:

2) Use Show Thickness by Color to display the IPW. The different colors show the different amounts of material left on the part:

3) While in the Thickness by Color dialog you can select various points on the IPW by simply left-clicking on the IPW in the graphics window.The value shown is the amount of material left at that particular location:

4) Use Clip Section to slice the model and IPW to better visualize areas that are difficult to see:

5) Move the Manipulator to the center of a hole to check hole depths and diameters:

Chad Varney
Application Engineer
Ally PLM Solutions, Inc.

Want more tips? Sign up HERE to receive our Tip of the Week.


Register for upcoming free NX webinars or learn more about Ally PLM Solutions.

Wednesday, December 10, 2014

Sailboat manufacturer eliminates physical mockups, saves 2 months development time

Wauquiez International designs better with Solid Edge. The company manufactures comfortable, fast and reliable sailboats for deep-sea cruising. Other benefits provided by the use of Solid Edge included getting boats to buyers sooner with faster design cycles and the use of virtual mockups to sell new boat concepts.
 

Learn how
http://www.plm.automation.siemens.com/en_us/about_us/success/case_study.cfm?Component=214289&ComponentTemplate=1481

Try Solid Edge for free

Friday, December 5, 2014

Medical device maker achieves 100 percent SolidWorks to Solid Edge data move; avoids modeling kernel change concerns

Helena Laboratories designs better with Solid Edge. The laboratory instrument maker documented multiple benefits in the move to Solid Edge and its synchronous technology. That included reductions in design and edit time, elimination of difficult history-based feature design processes, ability to leverage creativity and experience of design team veteran engineers, and the import and easy conversion of valuable wireframe designs.
(Watch the video and read the story)


Try Solid Edge for free

Tip of the Week December 5


Solid Edge Tip of the Week
December 5, 2014


Solid Edge - Reading the ST6 Holes.txt into ST7

There is a Hole Database Converter.exe you can run to add the old Holes.txt to the Excel sheets for ST7. 

1) Go to C:\Program Files\Solid Edge ST7\Custom\HoleDatabaseConverter\bin
 
2) Run the Hole Database Converter.exe
 
3) Select the Add button and select the old Holes.txt from ST6
 
4) Select Convert and the holes will be added to ST7 
 
The purpose of this exercise is to convert Holes.txt files to the .xlsx format

Navjot Gill
Application Engineer
Ally PLM Solutions, Inc.

Want more tips? Sign up HERE to receive our Tip of the Week.


Register for upcoming free Solid Edge webinars or learn more about Ally PLM Solutions.