This Blog has Moved

This blog has moved to www.allyplm.com/blog

To stay up-to-date with the latest news, tips and tricks, product enhancements and maintenance packs for Siemens PLM Software solutions, visit our new site!

For resources for specific products, you can navigate directly to the product resource page:
... and more!

Friday, May 29, 2015

Tip of the Week May 29


NX Tip of the Week
May 29, 2015
NX - Getting the Area of a Closed Curve

In this week's Tip, we will look at how to get the area of closed curve on a drafting drawing.
1)  In the Drafting application, select Analysis > Advanced Mass Properties > Area using Curves:

2)  Select Boundary (Temporary):

3) Select the curves.

4) Click OK on the 2D Analysis dialog.

5) Set the desired tolerance. Click OK.

6) Select the 'Perimeter/Area' button to display the information.


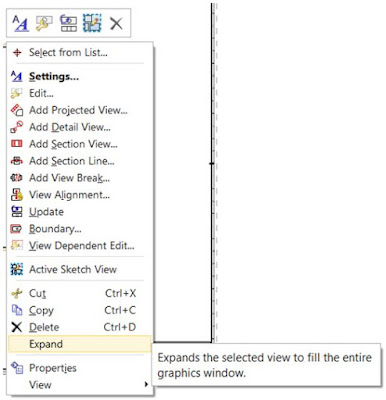
Note: If the curves are not selectable in Step 3, expand the view first before beginning the Area using Curves command.
          a) Hover the cursor over the view boundary, select MouseButton3 > Expand

b)  To turn the Expanded View off, hover the cursor over the view boundary, select MouseButton3 > Expand.

I hope you find this tip useful, thank you.
Navjot Gill
Application Engineer
Ally PLM Solutions, Inc.

Want more tips? Sign up HERE to receive our Tip of the Week.

Register for upcoming free NX webinars or learn more about Ally PLM Solutions.

Wednesday, May 27, 2015

Sheffield Sustainable Kitchens designs better with Solid Edge

High-tech sustainable kitchen manufacturer leverages Solid Edge’s library of parts, extensive re-use of data and convincing visualizations to reduce design time from two days to less than one. Other results included being able to supply almost five times the number of customer quotes per quarter with Solid Edge.


Try Solid Edge for free

Learn how Solid Edge can save you time on design and development at http://allyplm.com/solidedge/ or sign up for an informative webinar at http://allyplm.com/futureofcad/

Friday, May 22, 2015

Announcement of Product Download Enhancement

PROBLEM:
   We are pleased to announce that Product Download now includes full product
   releases and updates (Maintenance Releases, patches, etc.). We will no
   longer separate these two categories.
 
 REMEDY:
   This change allows us to take advantage of the latest download technology
   and optimized distribution channels for both Product Updates and full
   Products.  Please use the full Product download page to find all your
   Product Updates, maintenance releases or patches.
 
   In summary:  

  •    All Product Updates are NOW selectable in the 'Product Download' section.      
  •    All Product Updates are still selectable from their old location.   
  •    The current Product Updates page will be removed in the near future once 
  •    customers are accustomed to this change.   
  •    There is a new icon next to the download link for users who download files 
  •    using a Download Manager. Just click on the icon to generate a new separate 
  •    link in order to continue using the Download Manager.    
  •    In addition, a Search engine has been added to the Download page that 
  •    provides the ability to search all full products and updates.


The Ally PLM Technical Support Team is available to answer any questions and provide support for all of your needs including Product Downloads.  

You can contact the Ally PLM Technical Support Team via email at technical.support@allyplm.com or via phone at (513) 984-0480 Option: 4

Brandon Carter
Senior Application Engineer
Ally PLM Solutions

Tip of the Week May 22


NX Tip of the Week
May 22, 2015

NX - Using Extend Sheet in NX 10

Hello everyone - In this week's Ally PLM Tip of the Week, we will take a look at using Extend Sheet command in NX 10.

1)  In Modeling on the Surface Tab in the Surface Operations Group, click Extend Sheet (also in Shape Studio):

2)  Here are the surfaces that we are going to extend:

3)  Here is the command dialog for Extend Sheet:

4)  You can extend the sheet two different ways under Limit: 
       a.  Offset - uses a value for an offset value to extend/shorten the sheet.
            i.  In the example below, I selected both vertical edges of the green surface to offset/extend:

      b.  Until Selected - uses a face to extend to. 
            i.  In the example below,  I selected the right edge of the yellow surface and selected the face of the green surface to extend to:


5)  There are also other options to investigate under the settings group.
      a.  Surface Extension Shape


             i.  Natural Curvature:

             ii.  Natural Tangent:


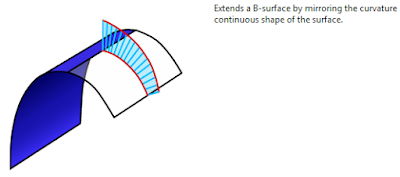
             iii.  Mirrored:


      b.  Edge Extension Shape

             i.  Automatic:

             ii.  Tangent:

             iii.  Orthogonal:

       c.  Body Output

             i.  Extend Original Sheet:

             ii.  Extend as New Face:

             iii.  Extend as New Sheet:

In this Ally PLM Tip of the Week, we took a look at using Extend Sheet to extend surfaces.  I encourage you to create a simple example like the screen shot above and try the different options outlined above.
Brandon Carter
Senior Application Engineer
Ally PLM Solutions, Inc.

Want more tips? Sign up HERE to receive our Tip of the Week.

Register for upcoming free NX webinars or learn more about Ally PLM Solutions.


Wednesday, May 20, 2015

Biotec Srl designs better with Solid Edge

Dental implant maker uses synchronous technology in Solid Edge to save time through use of one tool throughout the entire design process. Moving off its old 2D system, Biotec  also streamlined processes via parametric design features in one intuitive software program. Biotec also uses Femap software for finite element analysis (FEA) from Siemens PLM Software for designing very small parts such as the pins of dental implants.

Learn how

Try Solid Edge for free

Learn how Solid Edge can save you time on design and development at http://allyplm.com/solidedge/ or sign up for an informative webinar at http://allyplm.com/futureofcad/

Friday, May 15, 2015

Tip of the Week May 15


NX Tip of the Week
May 15, 2015

NX - Using Patch Openings in NX CAM

When trying to machine contoured surfaces with contour milling operations in NX CAM you may have issues with holes or gaps interfering with your tool path.  An example may be a mold or die insert that bolts into a pocket.  The part may have counter bored holes that break through the contoured shape you need to machine.  These holes can be easily covered using "Patch Opening" allowing the toolpath to travel smoothly across the part without trying to cut inside the hole.  An example (shown below) illustrates how to use "Patch Openings" to optimize a Z level operation. 

1)  Notice the tool path tries to cut inside the holes causing unwanted machining time: 

2)  Selecting only the faces that need to be cut causes excessive engage and retract moves:
3)  Use "Patch Openings" to cover the hole shapes:


4)  I have selected the contoured faces and the edge of the hole: 

5)  The faces must be added to the WORKPIECE: 


6)  Notice the tool path cuts smoothly across the hole:

Chad Varney 
Application Engineer
Ally PLM Solutions, Inc.

Want more tips? Sign up HERE to receive our Tip of the Week.


Register for upcoming free NX webinars or learn more about Ally PLM Solutions.

Wednesday, May 13, 2015

INTROTEST designs better with Solid Edge

Industrial diagnostic equipment manufacturer use synchronous technology in Solid Edge to reduce design time from 24 months down to nine months. In addition, the company was able to eliminate design errors and defects at the design stage and reuse previously created 3D models into projects.


Try Solid Edge for free

Learn how Solid Edge can save you time on design and development at http://allyplm.com/solidedge/ or sign up for an informative webinar at http://allyplm.com/futureofcad/

Friday, May 8, 2015

Tip of the Week May 8

 Solid Edge Tip of the Week
May 8, 2015

Solid Edge - Disabling Mass Units in Parts List

In this week's Ally PLM Tip of the Week we will show how easily you can disable the mass units in the Parts List column.

1)  After placing the initial Parts List, open up the Parts List Properties and go to the Columns Tab.
2)  Then add the Mass properties to your columns using the Add Column button: 

3)  The added Mass column will include units by default in the Parts list: 

4)  With the Mass column selected look at the Property text near the bottom of the window: 

5)  Here you will change the property text to  %{Mass (Item)/NU|G}  as shown below:


6)  Hit Apply and you will notice that the Mass column will no longer include mass units: 

7)  This information as well as similar formatting codes can be found in the Solid Edge Help at the link below: 

Nathan Pfeiffer
Application Engineer
Ally PLM Solutions, Inc.


Register for upcoming free Solid Edge webinars or learn more about Ally PLM Solutions.


Wednesday, May 6, 2015

Cooke Optics designs better with Solid Edge

The company’s keys to success include the use of both synchronous technology and ordered environment capabilities in Solid Edge, a smooth transition between 2D and 3D perspectives, and an easy data sharing process within the company and with suppliers. The results: successful product launches, enhanced lens accuracy to within 20 microns and a fast, efficient design process.


Try Solid Edge for free

Learn how Solid Edge can save you time on design and development at http://allyplm.com/solidedge/ or sign up for an informative webinar at http://allyplm.com/futureofcad/

Friday, May 1, 2015

Tip of the Week May 1


Solid Edge Tip of the Week
May 1, 2015

Solid Edge - Importing SolidWorks Part and Assembly Files
in Solid Edge

There are several options you can pick in order to open the SolidWorks model files in Solid Edge.

Option 1:  
File > Open Dialogue Box 


Option 2:
  • Batch Converter
  • Location:  C:\Program Files\Solid Edge ST7\Custom\Batch\Bin
Run Batch.exe file > select the folder. This option will convert all the SolidWorks files in a specified directory (use Browse to Folder to specify the folder) 


Option 3:
Use SolidWorks Data Migration - you need a seat of SolidWorks in order to run this tool 


Navjot Gill
Application Engineer
Ally PLM Solutions, Inc.

Want more tips? Sign up HERE to receive our Tip of the Week.


Register for upcoming free Solid Edge webinars or learn more about Ally PLM Solutions.